Purchasing through Amazon Punchout (Video Only)
Create a Receipt: Part 1 (Video Only)
Create a Receipt: Part 2 (Video Only)
Create a Requisition with a Non-Catalog Item
Create Requisition for Common Suppliers
View and Edit my Requisitions
Approve Requisition (for Managers)
Budget Amendment Requests
Create New Supplier Request
Create Supplier Invoice Request
View the Status of your Request
Supplier Invoice Request - Split Costs (Video Only)
Supplier Invoice Request for Honorarium (Video Only)
Supplier Management (Video Only)
My Reports (Video Only)
For additional help, please use the WorkdayHelp Ticket System.
| Create Receipt |
Accept PO |
The Workday task that records when goods are received. Receiving allows for the tracking receipt activity against purchase orders |
| Request Supplier Invoice |
Payment Request Form |
Supplier Invoice Request is a stand-alone Workday business process, completely separate from purchase orders and contracts. It is used when a supplier invoice is not available, for example an honorarium. |
| My Requisitions |
Purchase Order Inquiry |
A report that lists Requisitions initiated by worker. Information includes supplier, status, and PO Number. |
| Tenant |
TigerPaws or UI (User Interface) |
A unique instance of Workday that contains a set of data in a logically separated database. |
| |
|
|
This video walks you through how to place orders through Amazon punchout (which is also available for Dell).
This video offers a walk-through tutorial covering how to create a receipt in Workday for a purchase order that was requested through a requisition.
This video demonstrates how to make a receipt in Workday, once you have received your order.
Create a Requisition with a Non-Catalog Item
Non-catalog items are defined as any item you cannot procure from commonly-used suppliers configured within the punchout functionality.
The steps in this guide cover requesting non-catalog items for purchase and then creating a requisition with those items in Workday. This process is for when you cannot order and purchase an item through the approved vendor punchouts.
Explanatory Video
This video walks you through three main reports in workday: “My Requisitions,” “My Supplier Invoice Request,” and “My Supplier Request.”
-
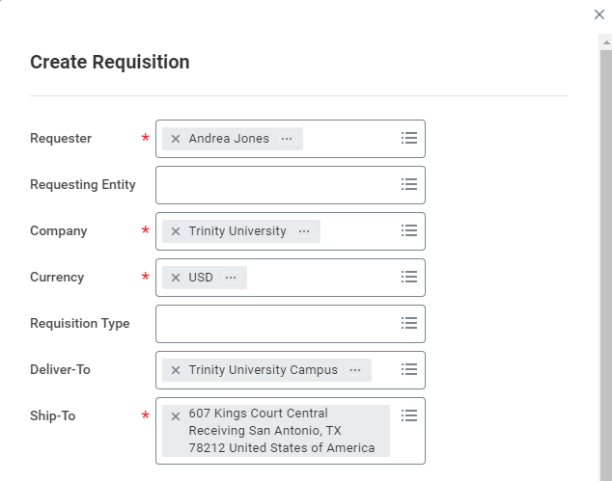
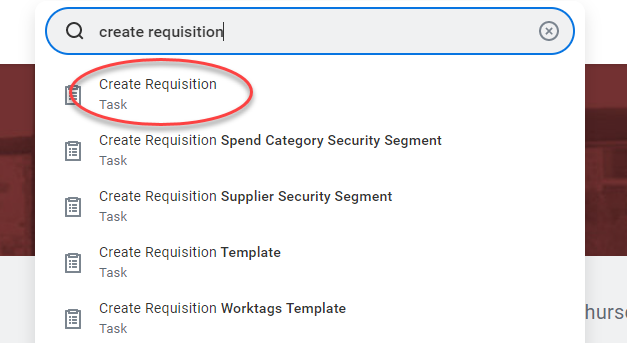
Type Create Requisition in the Workday Search bar. Select the Task Create Requisition from the drop-down menu of search results.

-
Your Requester, Company, Currency, and Deliver-To, and Ship-To information will default in on the Create Requisition form that opens. Confirm that your Cost Center is correctly listed; if you need to enter or update it, use the Search or Menu options available in that field. Additional Worktags will populate based on the Cost Center used. In Workday, Worktags allow users to “tag” certain transactions for the purposes of financial reporting and routing money to and from the correct ledger accounts. This eliminates the need for entering account numbers, instead using descriptive titles.
If you need to associate the Requisition with a particular Grant, Designation, Gift, Project, or Agency, again use the Search or Menu options available in the appropriate field to update or enter that information here. Additional Worktags may update with matching information. The fields are explained below:

-
Grant: If the purchase is tied to a particular grant, such as an NSF grant, select that specific grant in this field.
-
Designation: If the purchase is tied to designated university funds, select that specific designation in this field.
-
Gift: If the purchase is tied to a gift select that specific gift in this field.
-
Project: If this purchase is tied to a particular construction project, such as renovations, improvements, or additions, select the specific project in this field.
-
Agency: If the purchase is tied to a student organization, choose that organization in this field.
Once you are finished confirming or updating information on this screen, click Ok.
-
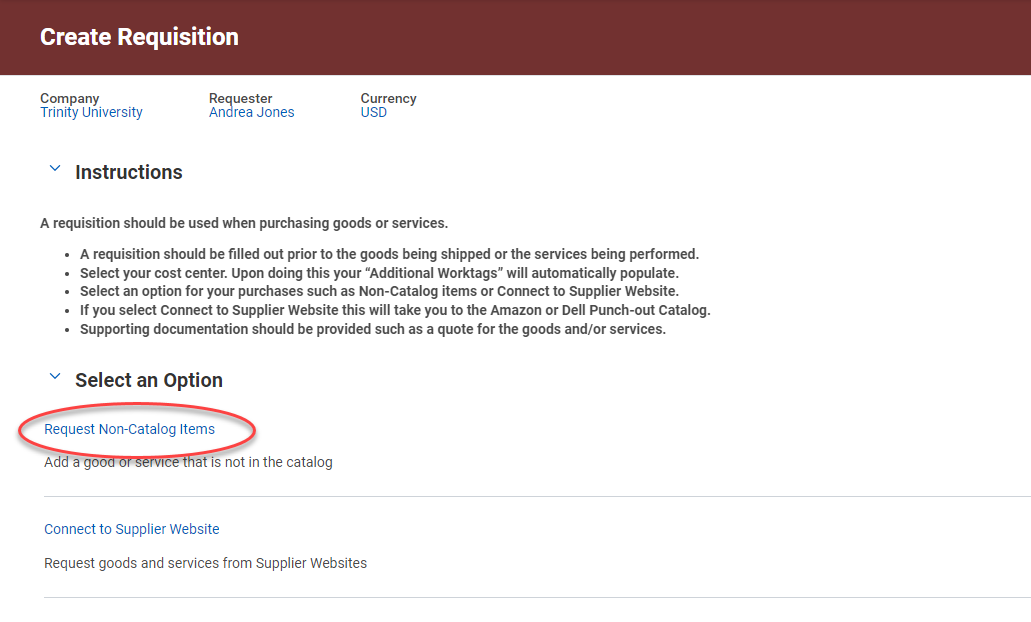
On the Create Requisition page, select Request Non-Catalog Items.
-
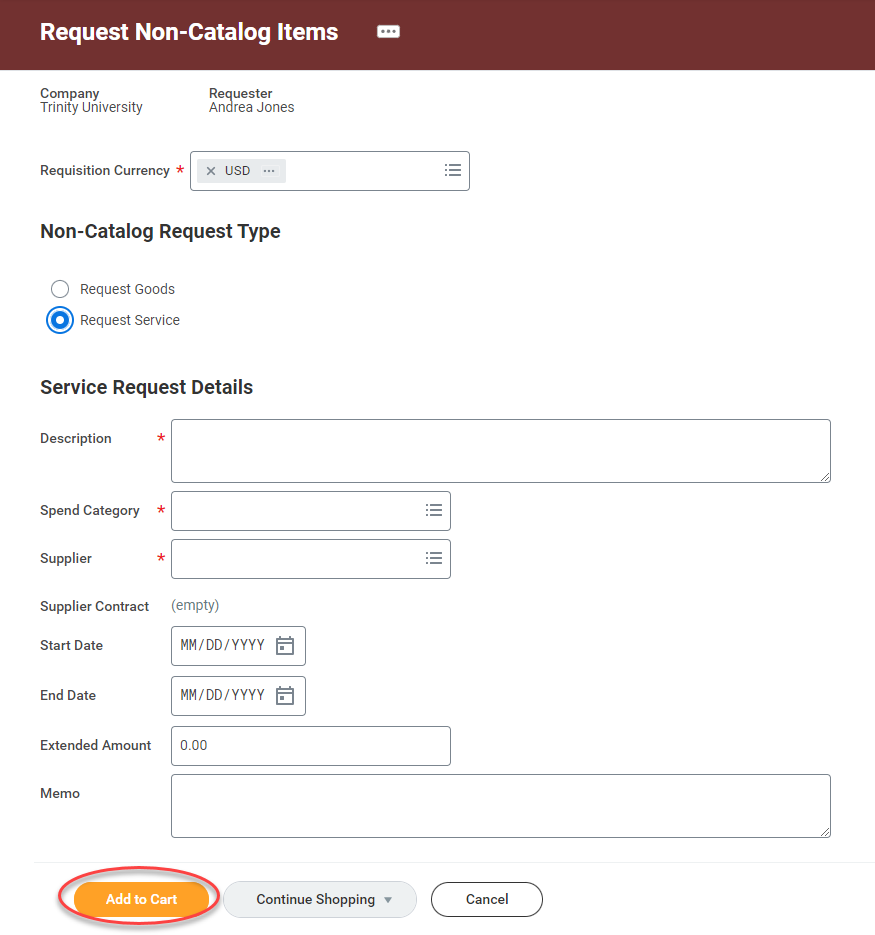
On the Request Non-Catalog Items page, enter the details of the purchase request as required; be sure to also include additional helpful information that will assist anyone involved in reviewing the request.
-
Indicate under Non-Catalog Request Type whether your Requisition is to Request Goods or Request Service with the appropriate radio button. Note that you may request both on one Requisition if needed; for instance, the purchase of a particular good may require the purchase of a warranty as well. Simply repeat the steps for the other purchase type after adding the first item you your cart.

-
If your request is for Goods:
-
Choose a Spend Category for the item, using the Search or Menu options available in that field. In Workday, the Spend Category groups similar spend items for the purposes of reporting and financial accounting. Examples of Spend Categories include Advertising & Promotion, Office Supplies, and Equipment.
-
Enter the supplier’s name into the Supplier field, using the Search or Menu options available in that field.
-
Enter the number of items you are requesting in the Quantity field.
-
Enter the Unit Cost for the items; then enter the Unit of Measure (e.g., Each).
-
The Extended Amount will calculate based on the information entered.
-
If you wish to add a note that will be seen by Accounts Payable, enter it later into the Internal Memo field during the Checkout process.
-
When you have finished, click Add to Cart. Repeat steps as previously noted to enter more than one type of request.
-
If your request is for Services:
-
In the Description field, enter a description for your service(s).
-
Choose a Spend Category for the item, using the Search or Menu options available in that field. In Workday, the Spend Category groups similar spend items for the purposes of reporting and financial accounting. Examples of Spend Categories include Advertising & Promotion, Office Supplies, Repairs & Service, and Uniforms.
-
Enter the supplier’s name into the Supplier field, using the Search or Menu options available in that field.
-
Enter the Extended Amount for the cost of the Service.
-
If you wish to add a note that will be seen by Accounts Payable, enter it later into the Internal Memo field during the Checkout process.
-
When you have finished, click Add to Cart. Repeat steps as previously noted to enter more than one type of request.
-
When all requests are added to your cart, access the cart by clicking the Cart icon in the top right corner of the screen.

-
When you are ready to complete your requisition, click Checkout.
-
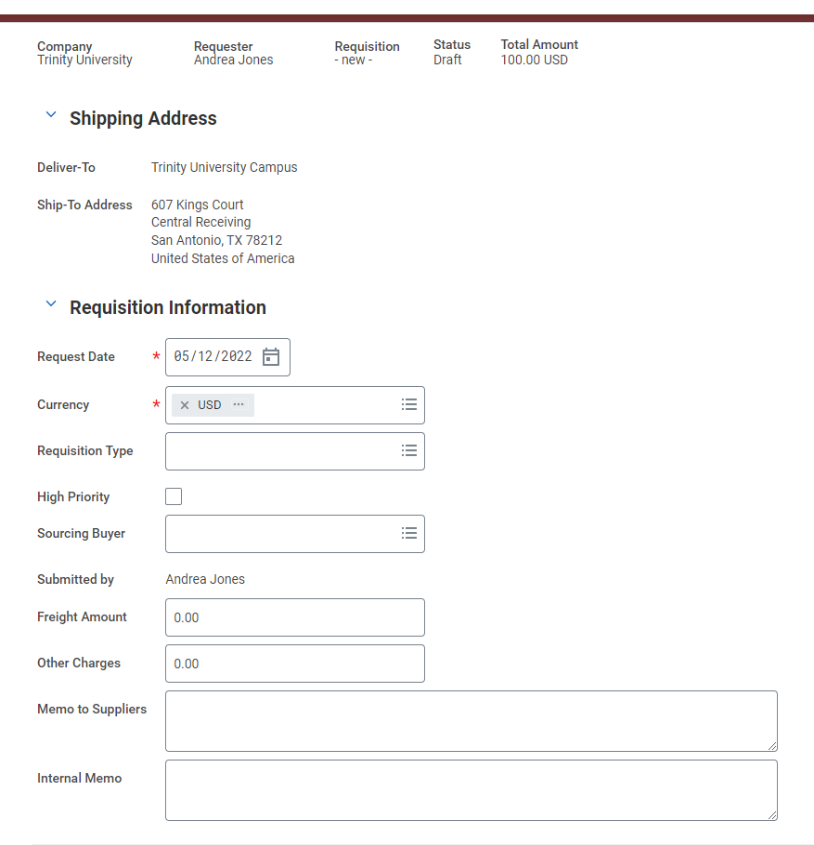
On the Checkout screen, you will verify your Requisition Information. Information entered in the Memo to Suppliers field will be provided to the supplier. If you wish to add a Trinity-only note, enter it into the Internal Memo field.
-
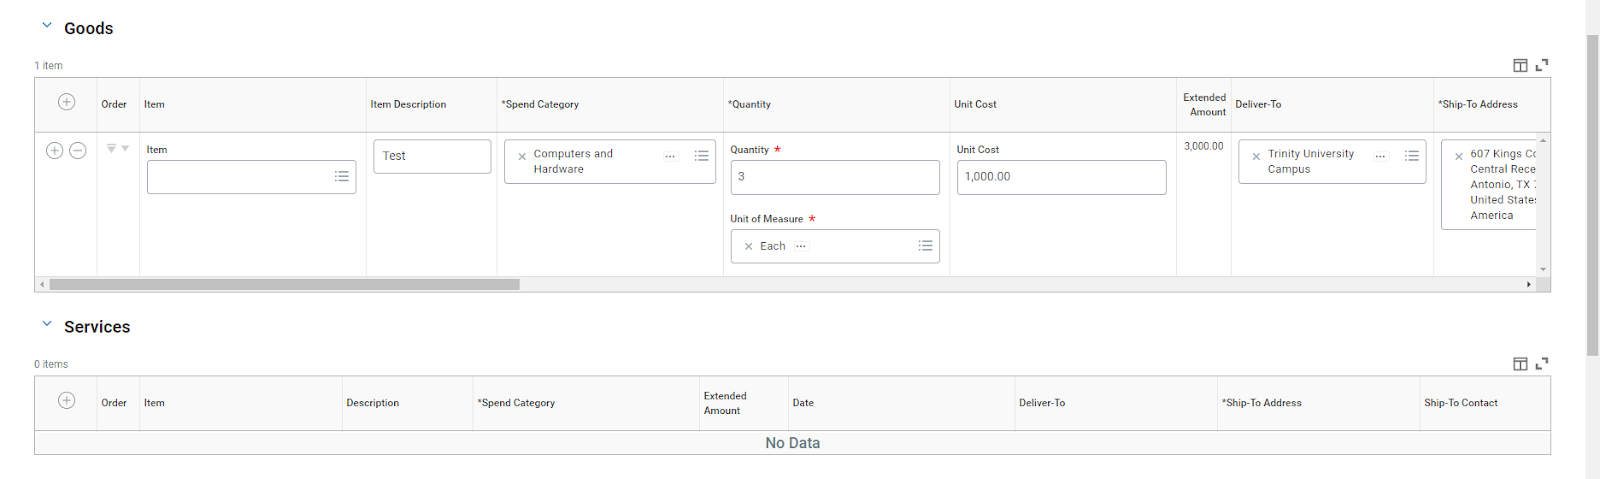
To review or enter accounting information about the item(s) being purchased, review the Goods and/or Services details in the appropriate area. The Spend Category should default from what you entered on the previous screen. If you need to change it, you can do so here. Scroll to the right in this section to access additional fields.
-
If the item(s) you are requesting require Location information, you will receive an Error message. Click on the red Error banner to see a description of the specific Error(s).


Enter the correct Location information into that field to remove that Error. The location is the building or area on campus which the item(s) will be placed into service.
Note: If you need to review or edit any of the Worktags related to the Item(s) be sure to do so in the appropriate section; for an explanation of all relevant Worktags, see information in step 2.
-
If you need to share the cost of the request across Cost Centers, scroll down to the item(s) to divide, and then scroll to the far right of the listing to the Splits column. The Splits button (see above) will appear as a 0 until you select it to add any split(s). Use this button if you wish to split the accounting of the item(s) by amount or quantity. Click the button to open the Split box.

Use the Split by field to select Amount or Quantity. Select Quantity if you want to split by number of items (e.g., 5 items to one grant and 5 to another). Use Amount if you wish to split by Amount of money (e.g., $2500 to one grant, $2500 to another grant) or Percent of the total to distribute to each Cost Center. Once you select which criteria you wish to split the requisition by, additional fields will appear where you can enter the appropriate Worktags. Note that your Split total must be the same as the Requisition total; Workday will track the Amount Split and Remaining Amount to Split to assist you. Click Done to save your Split information.
-
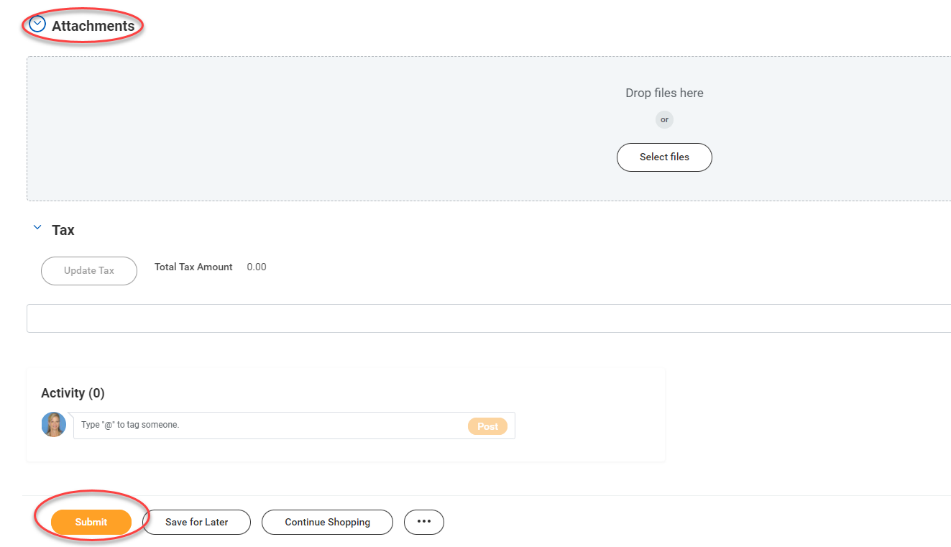
If you need to include any documentation with the Requisition, do so through the Attachments drop box/uploader available by clicking the dropdown arrow located there.

-
Be sure to click Submit when you are done, or select Save for Later to come back and review to submit at another time. If you need to add more items to the Requisition, click Continue Shopping.
-
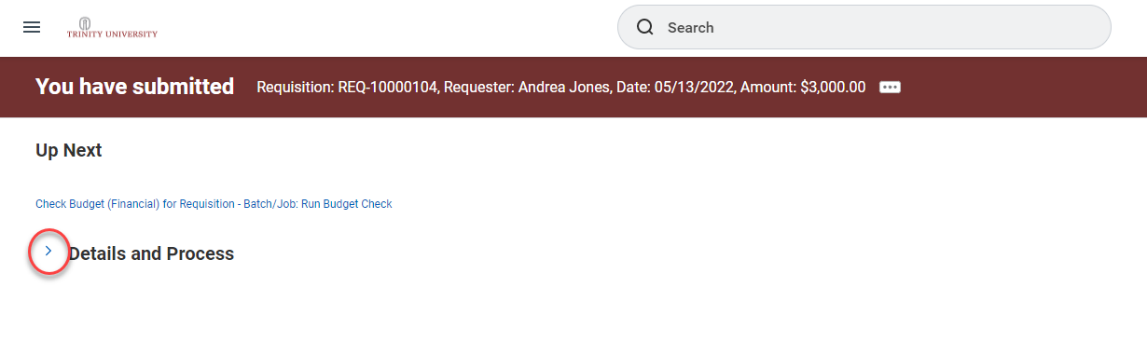
When you have clicked Submit, the requisition will now be automatically routed to the cost center manager and/or other users for approval or review. Workday will tell you the next step and to whom it is assigned.

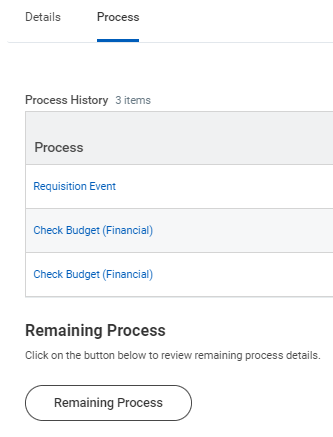
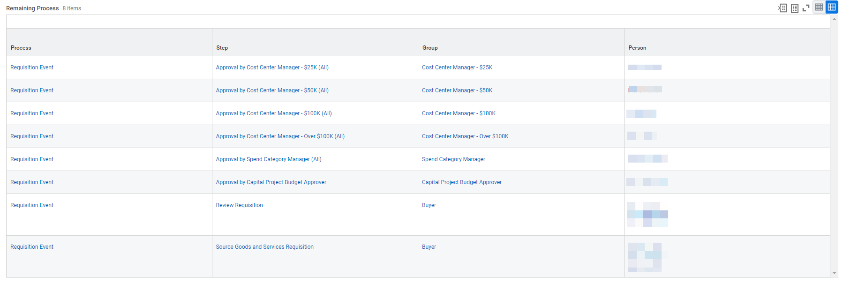
To see the next steps that the requisition will go through and to whom they are assigned, expand the Details and Processes section and click Process. This will display the Process History so far. If you wish to see the Remaining Process steps, click that button.
-
If the next reviewer sends the business process back to you, it will arrive in your Inbox with instructions for what you may need to change.
-
In Workday, it is important to note that the Requisition is not the complete order. Once the Requisition has been created and approved, it will become a Purchase Order that is sent to the supplier by Accounts Payable.
-
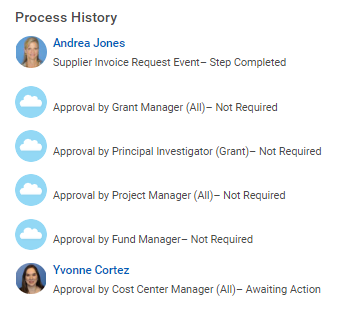
If you see a step in the process that is labeled Not Required, it means that this requisition did not meet the specifications for additional review. For example, Requisitions over a certain amount of money may require an additional approval, while those below that amount do not.
-
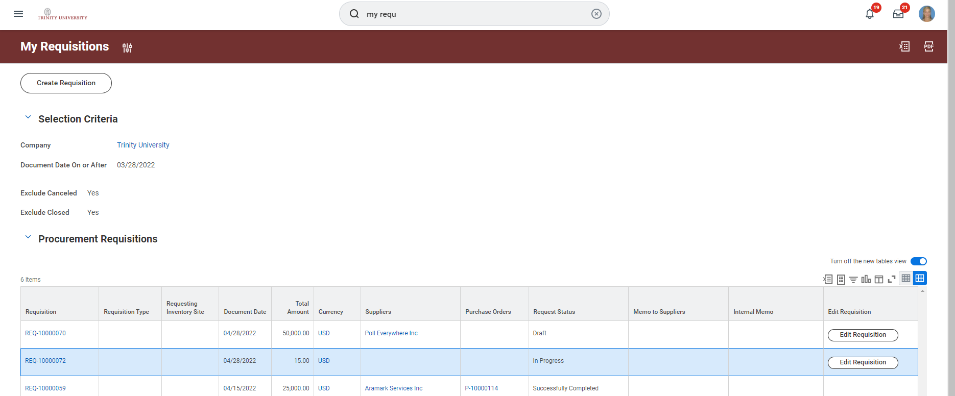
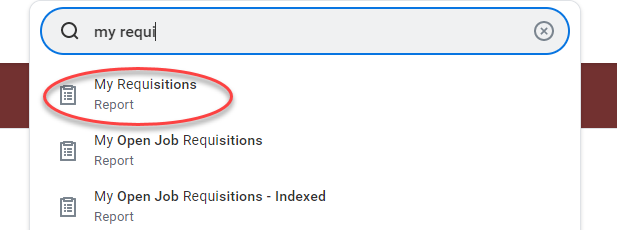
To monitor the status of your Requisitions on an ongoing basis, you can use the My Requisitions report. Search for this Report in the Workday search bar.

-
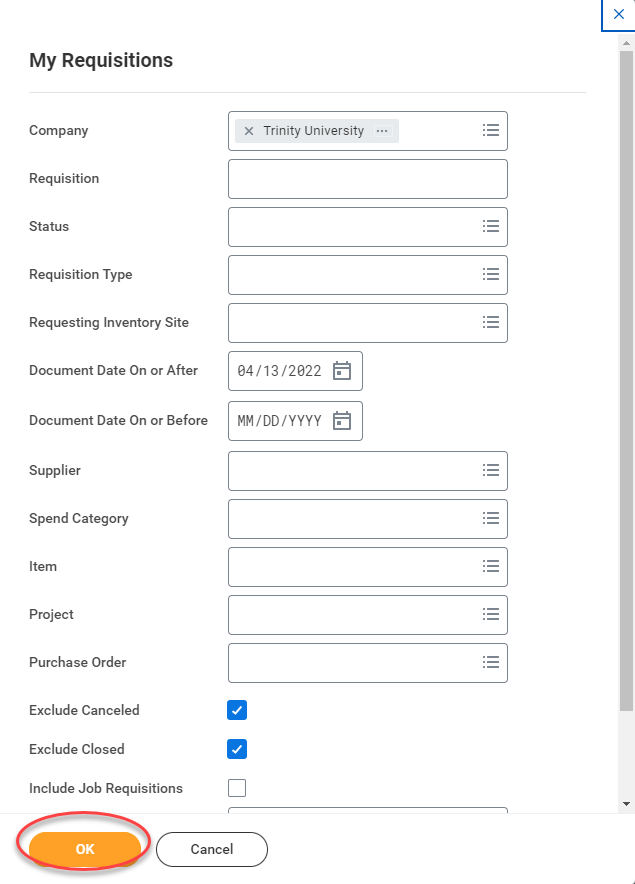
Enter any filtering information if desired into the My Requisitions Report screen and click OK.

-
You can click a particular Requisition number to view more information and expand the process history to see where the Requisition is in the process. If a Purchase Order has been created, it will be indicated in the grid as well, and you will be able to click it to review more information.
Create Requisition for Common Suppliers
This quick reference guide will cover how to create a requisition for item(s) you need to purchase from Dell and Amazon using the Punchout functionality in Workday.
The steps in this guide cover creating a Requisition using a connection between Workday and an external supplier Website with prices agreed upon between the vendor and Trinity University. If you wish to create a Requisition for an item that cannot be found in one of the vendors within this feature, please use the Request Non-Catalog Items quick reference guide. Do not use the Search Catalog option as Trinity University is not using the catalog functionality.
Explanatory Video
This video walks you through three main reports in workday: “My Requisitions,” “My Supplier Invoice Request,” and “My Supplier Request.”
-
Type Create Requisition in the Workday Search bar. Select the Task Create Requisition from the drop-down menu of search results.
-
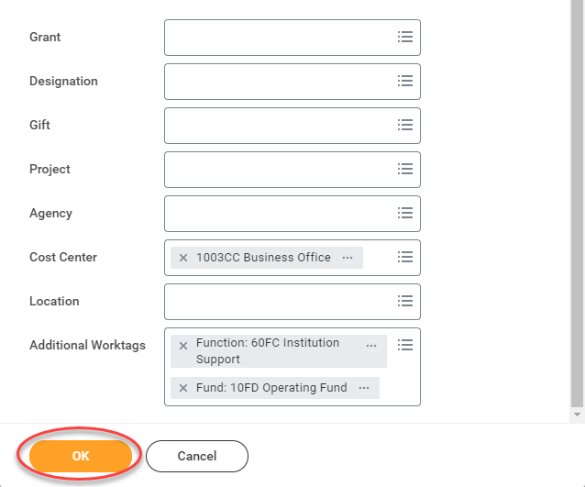
Your Requester, Company, Currency, and Deliver-To, and Ship-To information will default in on the Create Requisition form that opens. Confirm that your Cost Center is correctly listed; if you need to enter or update it, use the Search or Menu options available in that field. Additional Worktags will populate based on the Cost Center used. In Workday, Worktags allow users to “tag” certain transactions for the purposes of financial reporting and routing money to and from the correct ledger accounts. This eliminates the need for entering multiple account numbers, instead using descriptive titles.
If you need to associate the Requisition with a particular Grant, Designation, Gift, Project, or Agency, again use the Search or Menu options available in the appropriate field to update or enter that information here. Additional Worktags may update with matching information. The fields are explained below:

-
Grant: If the purchase is tied to a particular grant, such as an NSF grant, select that specific grant in this field.
-
Designation: If the purchase is tied to a designated university organization, select that specific designation in this field.
-
Gift: If the purchase is tied to a gift, such as an alumni gift or scholarship, select that specific gift in this field.
-
Project: If this purchase is tied to a particular project, such as renovations, improvements, or additions, select the specific project in this field.
-
Agency: If the purchase is tied to a special budget within an association or club, choose that organization in this field.
Once you are finished confirming or updating information on this screen, click Ok.
-
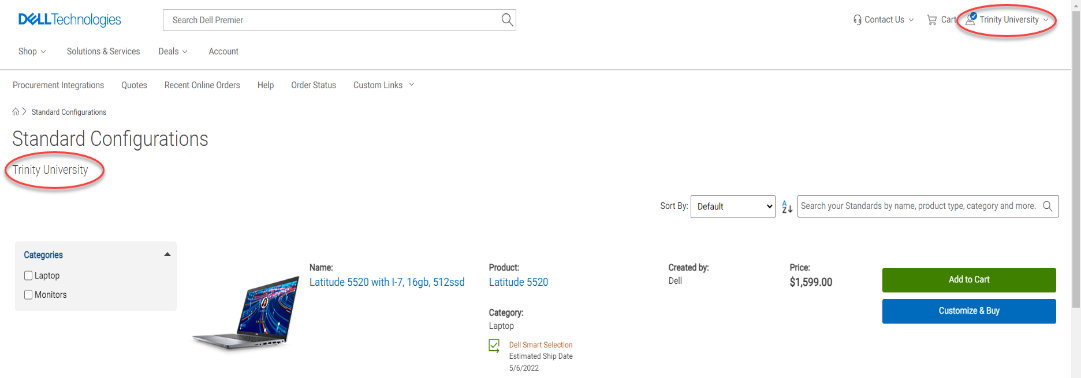
Website connections, called Punchouts, have been configured in Workday. There are currently connections to the Websites for Dell and Amazon. Using these Punchouts, you can select items you need to purchase directly on the Website and finish the process back in Workday. Additionally, the prices you see on the supplier Website are specifically agreed upon between Trinity University and the supplier. Confirm that you see the Trinity University designation(s) on the Web pages throughout the order process.

Click Connect to be taken to the Punchout Supplier Website you wish to purchase from.
-
You can now browse the supplier’s Website as you normally would. Items with prices that are on contract will be highlighted. Add items to your Cart or Customize & Buy as necessary.
-
When you have added all items into your cart and are ready to complete your order, go to your Cart to confirm that the details of the order are correct on the Supplier Website; update as necessary.
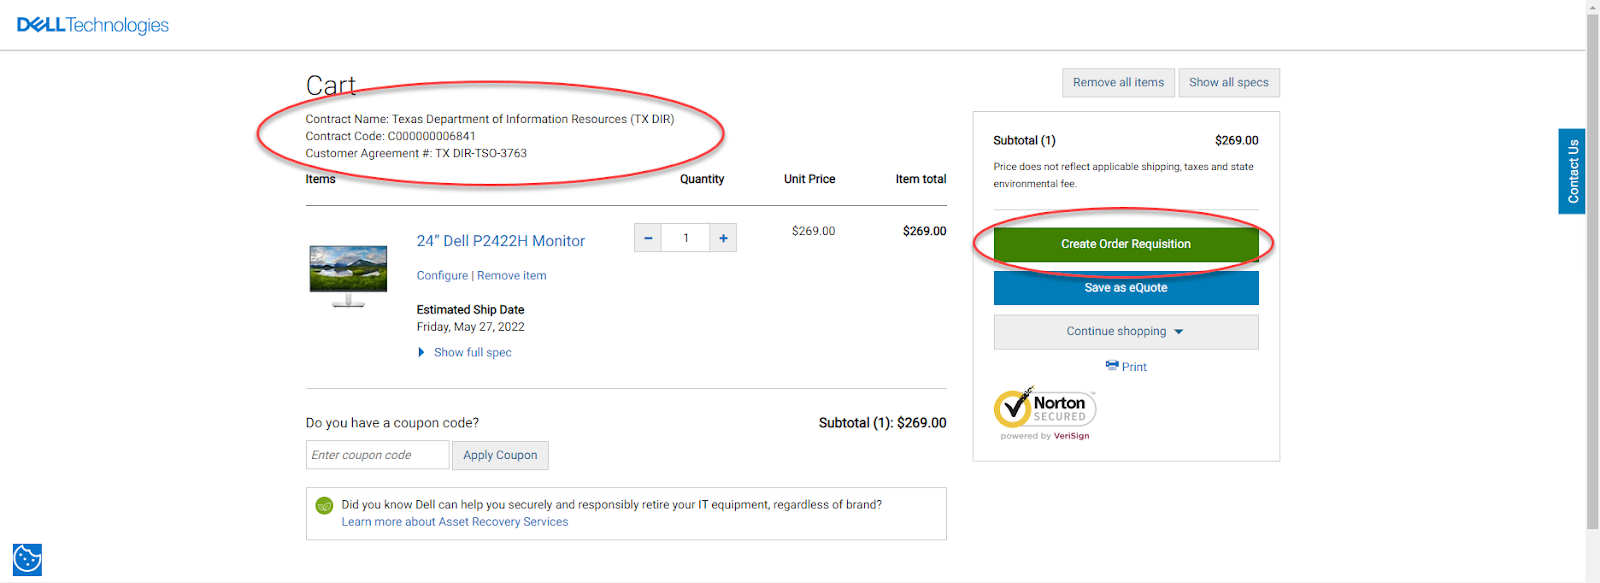
If you have more items to add, click the Continue Shopping button to add to your order from the current Supplier. Note that if you want to buy from a different Supplier, you will need to create a separate Requisition number and Purchase Order number for each vendor in a later step.
When your order for this Supplier is complete, click Create Order Requisition and then Continue Securely as directed on the confirmation page.
-
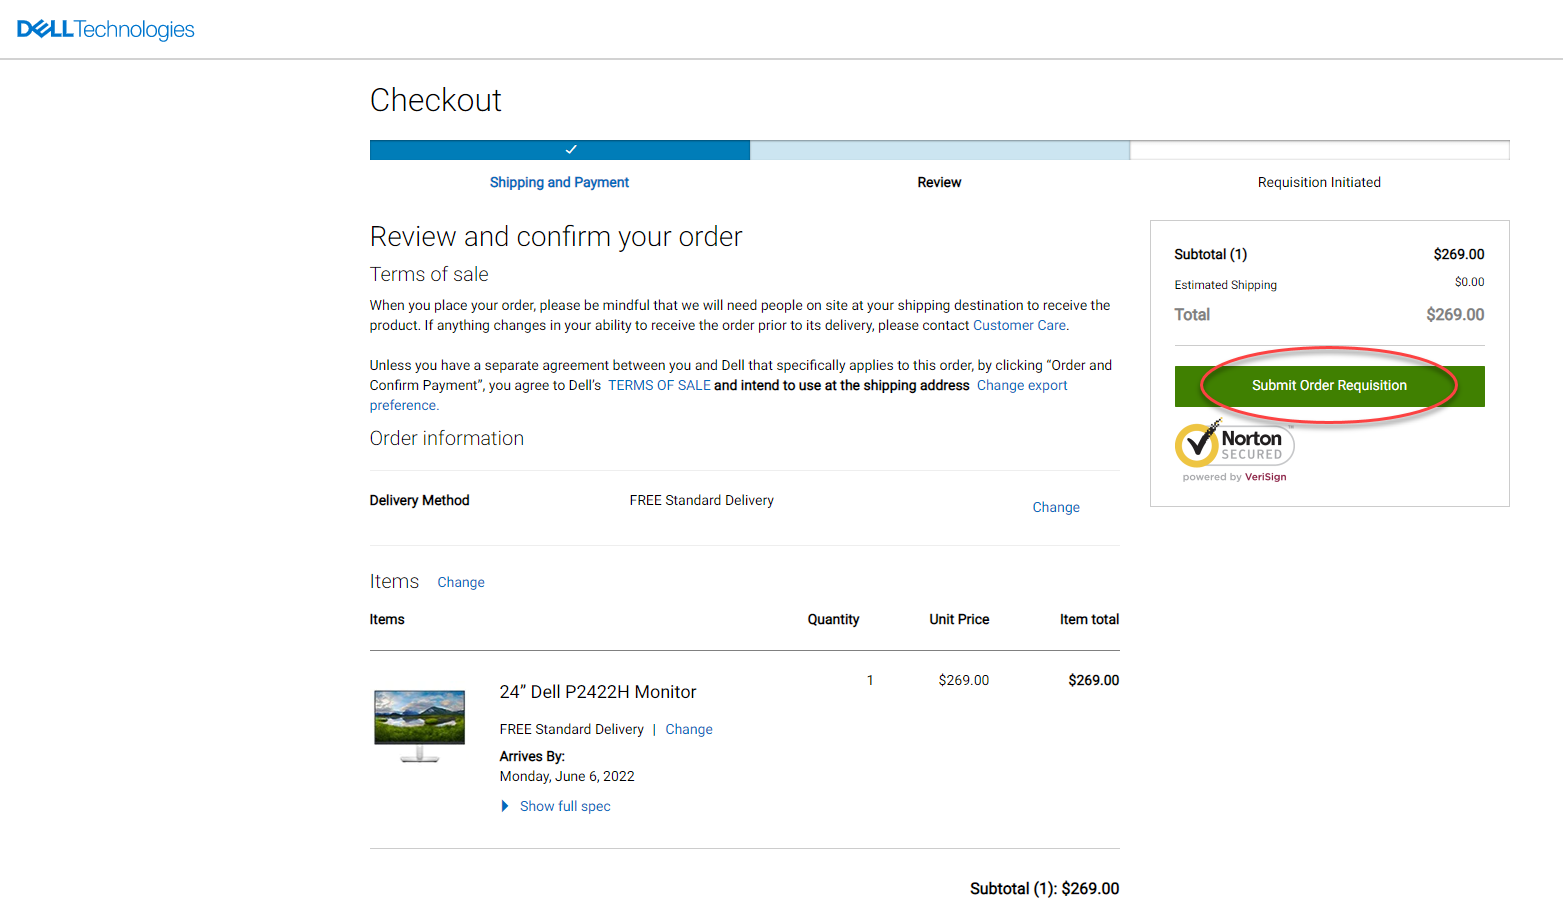
Review and confirm your order on the Supplier Checkout page; then click Submit Order Requisition and you will automatically be directed back into Workday to complete your request.
-
Your order information will default into the Workday View Cart screen.

-
If you have more items to add, click the Continue Shopping button. Note that if you buy from a different supplier, it will create a separate Requisition number and Purchase Order number for each vendor. When your Cart is complete, click Checkout.
-
On the Checkout screen, you will enter your Requisition Information.
-
The information for the Company, Requester, Total Amount, and Deliver-To and Ship-To Address will pre-fill based on the Requisition.
The information for the Ship-To Address and Contact fields will be sent to the vendor and should reflect where and to whom you want the goods to be sent.

-
Confirm that all information under Requisition Information is correct, adding or matching it to anything previously entered. Information entered in the Memo to Suppliers field will be provided to the supplier. If you wish to add a Trinity-only note, enter it into the Internal Memo field.

-
To review or enter accounting information about the item(s) being purchased, review the Goods and/or Services details in the appropriate area. The Spend Category should default from what you entered on the previous screen. If you need to change it, you can do so here. Scroll to the right in this section to access additional fields.

-
If the item(s) you are requesting require Location information, you will receive an Error message. Click on the red Error banner to see a description of the specific Error(s).

Enter the correct Location information into that field to remove that Error. You can also specify a Requested Delivery Date.
Note: If you need to review or edit any of the Worktags related to the Item(s) be sure to do so in the appropriate section; for an explanation of all relevant Worktags, see information in step 2.
-
If you need to share the cost of the request across Cost Centers, scroll down to the item(s) to divide, and then scroll to the far right of the listing to the Splits column. The Splits button (see above) will appear as a 0 until you select it to add any split(s). Use this button if you wish to split the accounting of the item(s) by amount or quantity. Click the button to open the Split box.

Use the Split by field to select Amount or Quantity. Select Quantity if you want to split by number of items (e.g., 5 items to one grant and 5 to another). Use Amount if you wish to split by Amount of money (e.g., $2500 to one grant, $2500 to another grant) or Percent of the total to distribute to each Cost Center. Once you select which criteria you wish to split the requisition by, additional fields will appear where you can enter the appropriate Worktags. Note that your Split total must be the same as the Requisition total; Workday will track the Amount Split and Remaining Amount to Split to assist you. Click Done to save your Split information.
-
If you need to include any documentation with the Requisition, do so through the Attachments drop box/uploader available by clicking the dropdown arrow located there.
-
Be sure to click Submit when you are done, or select Save for Later to come back and review to submit at another time. If you need to add more items to the Requisition, click Continue Shopping.
-
When you have clicked Submit, the requisition will now be automatically routed to your supervisor and/or other users for approval or review. Workday will tell you the next step and to whom it is assigned.
To see the next steps that the requisition will go through and to whom they are assigned, expand the Details and Processes section and click Process. This will display the Process History so far. If you wish to see the Remaining Process steps, click that button.

-
If the next reviewer sends the business process back to you, it will arrive in your Inbox with instructions for what you may need to change.
-
In Workday, it is important to note that the Requisition is not the complete order. Once the Requisition has been created and approved, it will become a Purchase Order. Once it becomes a Purchase Order, there are additional approvals within Accounts Payable that will be completed before it is sent to the vendor.
If you see a step in the process that is labeled Not Required, it means that this requisition did not meet the specifications for additional review. For example, Requisitions over a certain amount of money may require an additional approval, while those below that amount do not.
-
To monitor the status of your Requisitions on an ongoing basis, you can use the My Requisitions report. Search for this Report in the Workday search bar.
-
Enter any filtering information if desired into the My Requisitions Report screen and click OK.

-
You can click a particular Requisition number to view more information and expand the process history to see where the Requisition is in the process. If a Purchase Order has been created, it will be indicated in the grid as well, and you will be able to click it to review more information.

-
You can also find and track Purchase Orders by searching Find Purchase Orders in Workday.
Explanatory Video
This video walks you through three main reports in workday: “My Requisitions,” “My Supplier Invoice Request,” and “My Supplier Request.”
-
After logging into Workday, use the My Requisitions report to monitor the status of your Requisitions on an ongoing basis, you can use the My Requisitions report. Search for this Report in the Workday search bar.

-
Enter any filtering information if desired into the My Requisitions Report screen and click OK.
-
You can click a particular Requisition number to view more information and expand the process history to see where the Requisition is in the process. If a Purchase Order has been created, it will be indicated in the grid as well, and you will be able to click it to review more information.

-
If you choose to Edit an open Requisition, see instructions for Creating a Requisition of the appropriate type. You will see the following reminder related to your edits:

Note: This option is not available for Approved Requisitions.
-
If you select Cancel the Requisition through the More Actions menu, no further action will be possible on that Requisition, so be certain that you are done with the Requisition before canceling it.

You will be directed through a cancellation confirmation process. You may be required to enter a Comment.
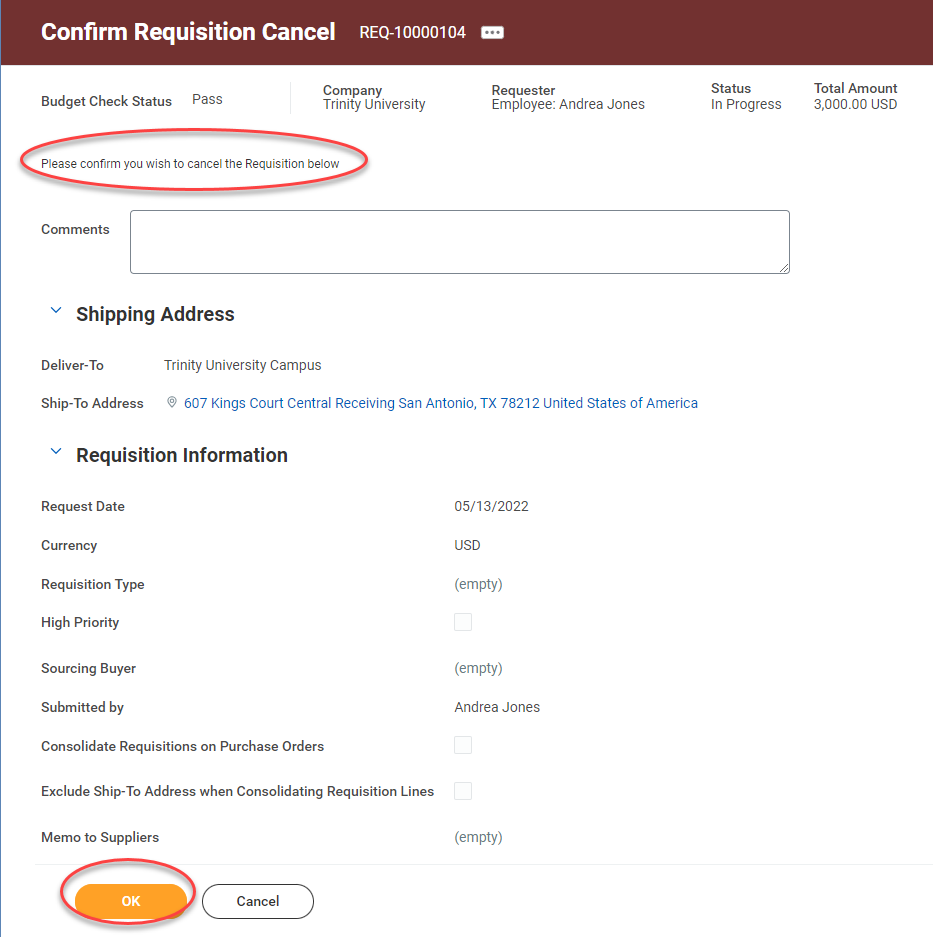
Click OK to confirm your cancellation. You will then see the status has been changed to Canceled.

Approve Requisition (for Managers)
Certain manager roles will be responsible for approving requisitions submitted by their direct reports. When someone submits a requisition, you will receive an inbox item where you can review it, approve it, or send it back to the originator for more information.
-
After logging into Workday, access your inbox by clicking the Inbox icon at the top right corner of the screen.

-
In your Inbox you will find any requisitions or other items you need to review and/or approve under the Actions tab. Click on the requisition item to review it. Previous entries for actions that have been taken are under the Archive tab.

-
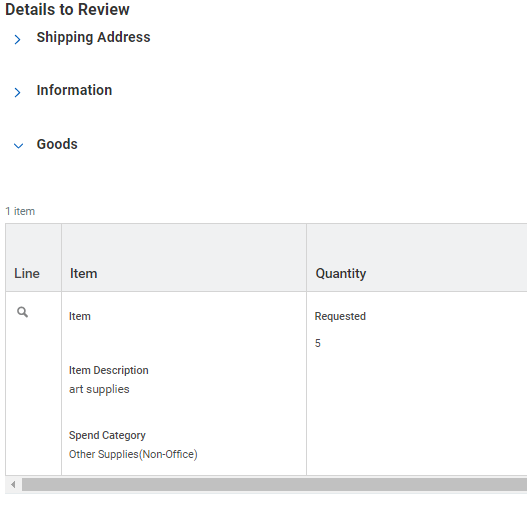
Scroll down in the inbox item to view the Requisition details under Goods and/or Services.
-
On the requisition line, you will need to scroll to the right in the grid to see the Worktags and other information about the order. Review all lines to ensure that the correct information has been entered and that the correct Worktags have been specified.
-
To open other sections on the requisition, click each heading name (i.e., Shipping Address, Information, etc.). See below for what you should review on the requisition prior to approving.
-
The requisition has the correct Spend Category (remember that the Spend Category defines what is being purchased).
-
The Extended Amount is accurate (note: you may need to scroll to the right in the grid at the bottom to view these additional fields).
-
Review all Worktags to make sure that the accounting is correctly reflected. For example, if this requisition should be paid from a Grant, make sure that the grant has been entered as the Grant Worktag.
-
If the Requisition has been itemized, check that the Worktags on the itemization are correct. Note that users should not use the Splits functionality just to split lines; there should be multiple lines only if the accounting should be split.
-
Scroll to the bottom of the Requisition page to review the Process History.
-
If the requisition meets with your approval, click the Approve button at the bottom.

-
If the originator needs to correct the requisition, click the Send Back button. You can also use the Send Back button if the originator tells you they made an error and needs to make changes. Once corrected or adjusted, the Requisition will then come back to you for review and approval.
-
Once you approve, the Requisition will continue through the approval process.
Budget Amendment Requests
-
The Budget Check process happens on Requisitions, checking them against your Cost Center’s available Supplies & Expenses (S&E) Budget.
-
If there is available budget, then it will “pass” the Budget Check and move on in the process.
-
If there is no available budget, then it will “fail” the Budget Check.
-
The entry will route to the Cost Center Manager for approval first, to confirm and approve that the Cost Center will be over budget (this is allowed).
-
If approved,
-
The Cost Center Manager approves going over budget, which re-initiates the process;
-
The Requisition is then re-sent to the Cost Center Manager’s Inbox for approval; once the Requisition is approved, it will then move on in the process as normal.
-
If denied, the initiator and Cost Center Manager can work together to research or change to a Cost Center, Designation, or Gift that has available funds.
-
Coordinate with your Budget Analyst on how best to cover the deficit or if you have any questions.
Create New Supplier Request
Explanatory Video
This video walks you through three main reports in workday: “My Requisitions,” “My Supplier Invoice Request,” and “My Supplier Request.”
This is the process that you should use when you have received a supplier invoice that needs to be paid by Accounts Payable but the supplier is not currently in the system.
To submit this request, you will need:
-
Supplier Contact Information
-
Any other supporting information
-
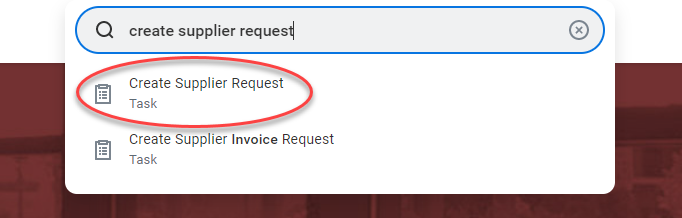
Enter Create Supplier Request in the Search bar and select the Create Supplier Request task.

-
Scroll down the page to the Contact Information section. Use the Add buttons to add a Phone Number, Address, and Email. Note that for each email address, phone number, and address you enter, you will need to check the Primary checkbox. Contact information is required before you can submit this request.

-
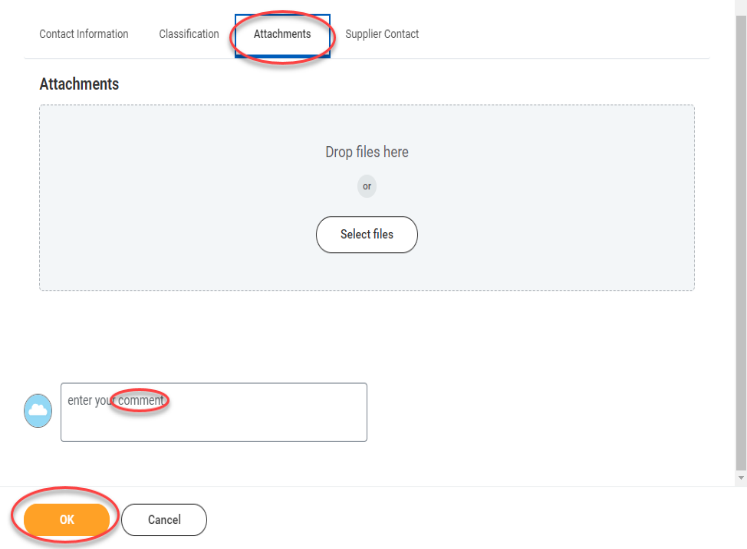
Click the Select Files button and locate the W-9 and invoice (as well as any other supporting material) on your computer to upload.
-
Optional: Enter a Comment in the comment field at the bottom of the screen explaining your request.
-
When you are finished, click OK.
-
The request will now be submitted for approval. Note that if approvers need more information or need you to correct information, they may send the request back to your Workday Inbox for review and/or correction.
If you need to view your supplier request after submitting

-
To view all information about your supplier request, click the magnifying glass for that supplier request.
-
You can now view all of the information you entered for the supplier request.

Create Supplier Invoice Request
Explanatory Videos
This video walks you through three main reports in workday: “My Requisitions,” “My Supplier Invoice Request,” and “My Supplier Request.”
This video shows you how to create a general supplier invoice request.
The process that follows will show you how to upload a supplier invoice into Workday.
-
Enter Create Supplier Invoice Request into the Search bar and select the Create Supplier Invoice Request task.

-
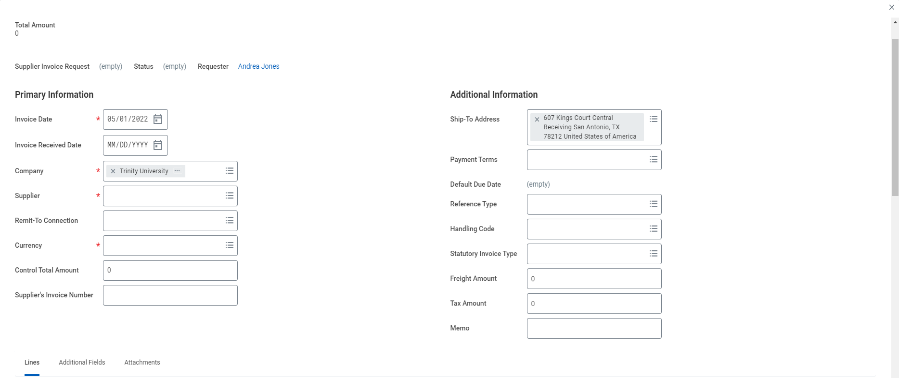
Enter the following information into the fields on the Primary Information section:
-
Invoice Date: This will default to today’s date. Enter the date of the invoice if it is different. This is a required field.
-
Invoice Received Date: Enter the date you received the invoice. This is a required field.
-
Company: This will default to Trinity University. This is a required field.
-
Supplier: Enter the supplier into this field. You can enter a few letters of the Supplier name and click enter to search, or you can click the prompt in this field to locate the supplier. If the Supplier is not in Workday, please submit a Create Supplier Request (see that QRG for instructions), then return to this task. This is a required field.
-
Currency: Enter the currency, typically USD. Note that handling codes are required for foreign currency requests. This is a required field.
-
Supplier’s Invoice Number: Enter the invoice number from the supplier. This is a required field.
-
Enter the following information into the field on the Additional Information section.
-
Scroll down to the Lines section of the screen.
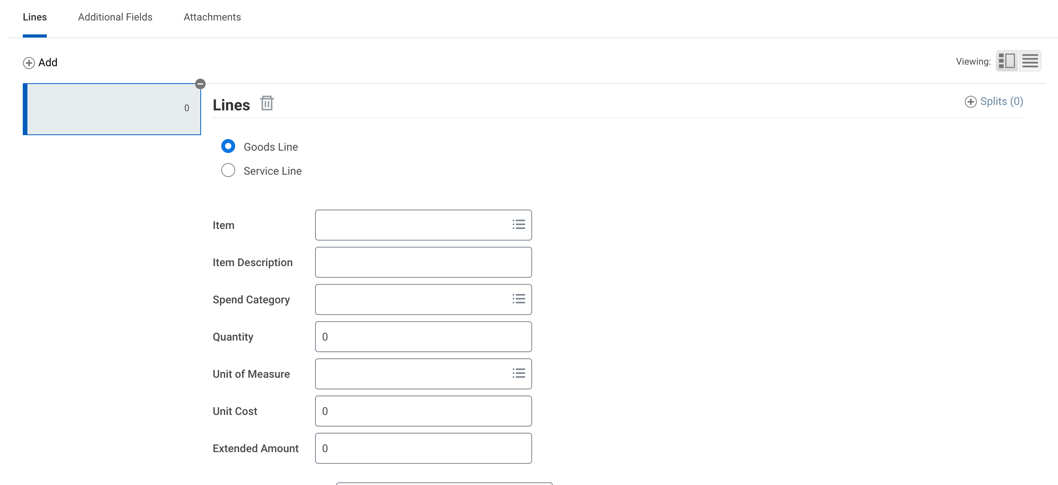
-
First choose whether this is a Goods Line or Service Line.
If the invoice is for goods
-
Enter the following information into the fields on this screen:
-
Item: Do not select a value in this field.
-
Spend Category: Use the prompt in the field to select the appropriate spend category that corresponds to your goods (e.g., General Office Supplies). This is a required field.
-
Quantity: Enter the quantity of items.
-
Unit of Measure: Choose the unit of measure of the item (e.g., Dozen, Each, Case, etc.)
-
Unit Cost: Enter the item of each unit.
-
Extended Amount: This value will calculate automatically. If the amount is flat and you do not know the per unit amount, enter that full amount in this field.
-
Scroll down for the next set of fields, which are Worktag fields. These allow you to associate your invoice request with specific financial designations, which will ensure that they are routed correctly to and from the appropriate ledger accounts. The fields are described below.

-
Grant: If the expense report is tied to a particular internal or external grant, such as an NSF grant, select that specific grant in this field.
-
Project: If this expense report is tied to a particular construction project, such as renovations, improvements, or additions, select the specific project in this field.
-
Agency: If the expense report is tied to student organization choose that item in this field.
-
Designation: If the expense report is tied to designated funds, select that specific account in this field.
-
Gift: If this expense report is tied to a gift elect the specific account in this field.
-
Cost Center: The cost center is based on your department. Cost Center is required.
-
Location: Use the prompt to enter the building location that the goods will be placed in service. This field is required if a trackable spend category is selected.
-
Additional Worktags: Values in this field will default. Additional Worktags field is required.
-
Use the Memo field to add a note to the line that will be viewable by the Supplier.
-
To add additional item Lines, use the Add button at the top left corner of this section. To remove a Line, use the Trash Can next to Lines.
-
To add a note for Accounts Payable, for example payment needs to be expedited, or there are special instructions you may want to convey, add the message in this field at the bottom of section

If the invoice is for services
-
Enter the following information into the fields on this screen:

-
Item: Do not select a value in this field.
-
Spend Category: Use the prompt in the field to select the appropriate spend category that corresponds to your service (e.g., Professional Services or Honoraria/Speaker Fees).
-
Extended Amount: Enter the amount of the invoice into this field.
-
See steps 7 and 8 for information about the Worktag fields and Memos on this screen.
-
To add additional service lines, use the Add button at the top left corner of this section. To remove a Line, use the Trash Can next to Lines.
Attaching the invoice and submitting
-
When you are finished entering your invoice Lines, click the Attachments tab.

-
Note that you are required to upload supporting documentation (the original invoice) for the create supplier invoice request.
-
Use the Select Files button to locate your files for upload into the Attachments grid.
-
Once you are finished, click Submit. The request will now be routed for review and approval. Note that if approvers need more information or need you to correct information, they may send the request back to your Workday inbox for review and/or correction.
Explanatory Video
This video walks you through three main reports in workday: “My Requisitions,” “My Supplier Invoice Request,” and “My Supplier Request.”
-
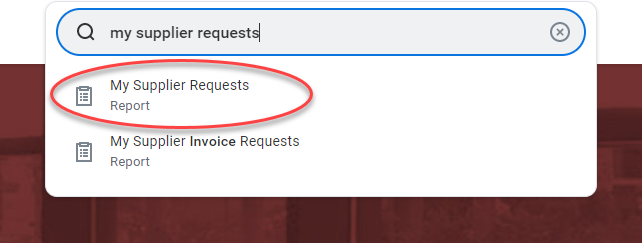
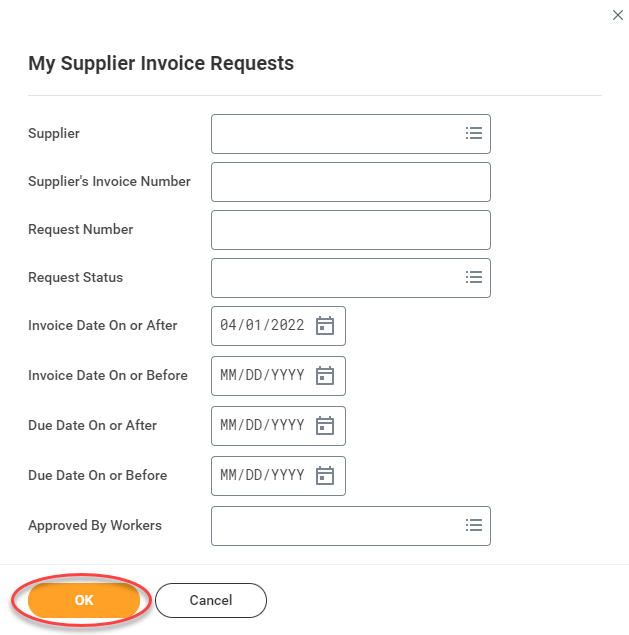
Once you have submitted your request, you can use the My Supplier Invoice Requests report to monitor its status. Enter the name of this report into the search bar and press enter.

-
Enter any necessary filtering information into the report search criteria and click OK.
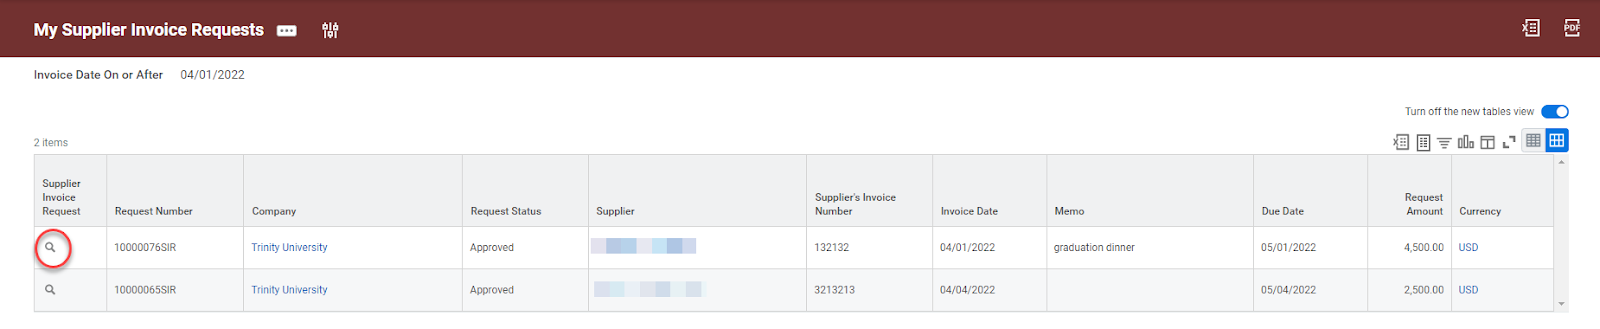
-
You will be able to view a list of your Supplier Invoice Requests and their Status. Use the magnifying glass icon to open the Supplier Invoice Request to view more details. The Process History tab will show you the remaining steps in the workflow; scroll down for a record of any Activity on the request.
This video demonstrates how to divide costs on an order between more than one cost centers.
This video shows you how to create a supplier invoice request that does not have an associated invoice (such as for honorariums).
This video explains how you can add a supplier (both corporations and individuals).
This video walks you through three main reports in workday: “My Requisitions,” “My Supplier Invoice Request,” and “My Supplier Request.”
There are currently no forms for these topics.
For additional help, please use the Workday Support Request Form or send an email to transform@trinity.edu.