Create an Expense Report
Create an Expense Report (PCard)
Change an Expense Report
Cancel an Expense Report
Approve an Expense Report (for Managers)
TU Cash Transmittal Form
For additional help, please use the WorkdayHelp Ticket System.
|
|
Check Run |
A group of items to be paid (such as supplier invoices and expense reports). |
| Obligation |
Encumbrance |
Accounting that reflects where the organization has obligated itself to spend funds on something for which it has yet to receive consideration, or earmarking. |
| Accounting Journal |
Journal Entry |
Accounting journals are manual journals that may be used to transfer funds from one account to another or to correct transactions that do not fall within the parameters of an Accounting Adjustment. |
| Accounting Adjustment |
Journal Entry |
Accounting Adjustments are used to correct certain worktags on non-payroll spend transactions, i.e. spend category, cost center, grant, gift or designation. |
| Spend Category |
Object Code (5XXXX), (6XXXX), (7XXXX) |
Expense items and purchase items are assigned to a spend category. It is a classification in procurement and resource management that provides a logical grouping to search and report on. |
| Action |
|
A step in a business process within Workday a worker must complete (e.g. edit information, approve, deny, etc.). |
| Cost Center |
|
Unit within organization to which expenses are charged. This is the level at which budgets are created/managed. |
| Costing Allocation |
|
Provides the flexibility to allocate all or a portion of a salary to be paid from a Cost Center other than the default |
| Function |
|
Custom related worktag that identifies the general purpose of a transactions. |
| Event |
|
A transaction that occurs within your organization. |
Create an Expense Report
-
After logging into Workday, click the Menu in the top navigation bar to access the global navigation.

-
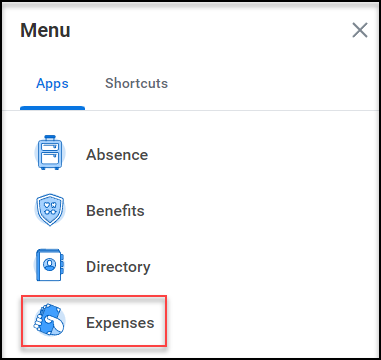
Click on the Expenses menu item.
-
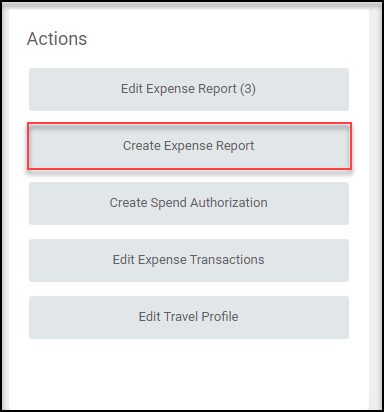
On the Expenses dashboard, you can either complete Actions (edit expense report, create expense report) or you can View (reports, authorizations, transactions, and payment elections). Click on Create Expense Report.

-
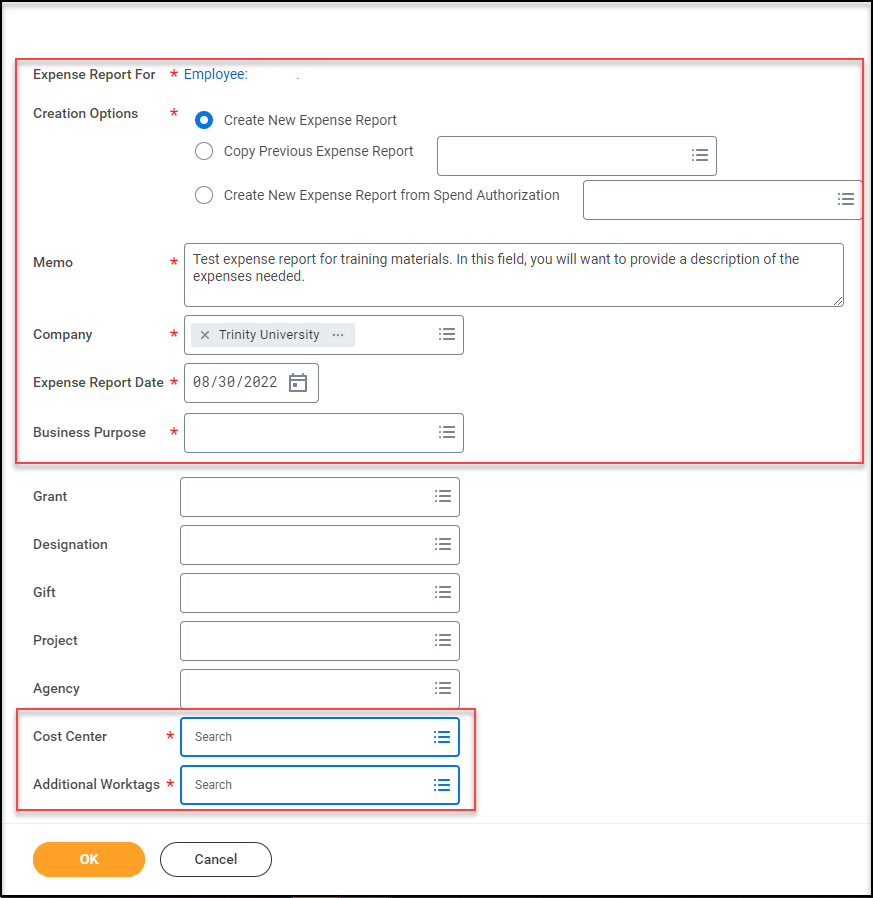
You can choose to Create New Expense Report, Copy Previous Expense Report or Create New Expense Report from Spend Authorization. The following fields are required.
-
Enter a Memo for the Expense Report to describe the origin of your expense.
-
The Company field will automatically default to Trinity University.
-
The Expense Report Date will default to today’s date. Change this date if needed to reflect the appropriate date of the expense.
-
Enter your Business Purpose.
-
Select the appropriate Cost Center for the expense. This field will be pre-populated with your default Cost Center.
-
Additional Worktags: Values in this field will default based on the Cost Center and/or other Worktags.
-
The fields labeled Grant, Designation, Gift, Project, and Agency are Worktag fields. In Workday, Worktags allow users to “tag” certain transactions for the purposes of financial reporting and routing money to and from the correct ledger accounts. This eliminates the need for entering multiple account numbers, instead using descriptive titles. For your expense report, the Cost Center and some Additional Worktags will default based on your department. The other fields are explained below:
-
Grant: If the expense report is tied to a particular grant, such as an NSF grant, select that specific grant in this field.
-
Designation: If the expense report is tied to designated university funds, select that specific designation in this field.
-
Gift: If the expense report is tied to a gift, select that specific gift in this field. Project: If this expense report is tied to a particular construction project, such as renovations, improvements, or additions, select the specific project in this field.
Note that you will be able to specify different Worktags by expense line to split accounting if needed.
-
Upon completion, click OK to begin entering your expenses.
-
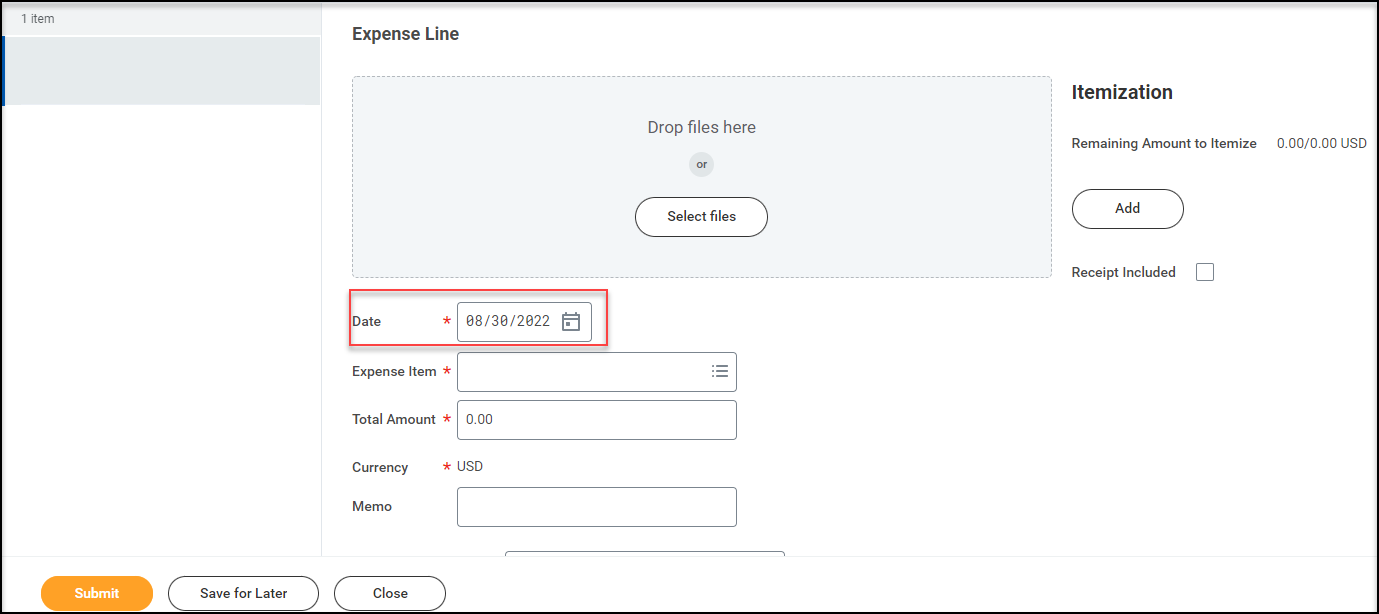
Now you can begin entering your Expense Lines. Click the Add button.

-
On the Expense Line, first enter the Date.
-
Enter the Expense Item. You can search By Expense Item Group, By Spend Category, By Alphabetical Order or by typing text in the Search field.

-
Enter the Total Amount.
-
Enter a Memo describing this expense (optional).
-
The Worktag fields (Cost Center, Additional Worktags) will default. You can change these values if needed to reflect the correct accounting.
-
The Itemize button allows you to split the accounting for this expense. If you need to itemize this expense, you can click the Add button under the Itemization heading and enter the appropriate worktags.
-
To add a receipt, select the file from the Attachments from File button.

-
Do not click Submit until you have entered all your expenses onto this report. You can continue to add lines using the Add button. If you wish to save the expense report for later, click Save for Later.
-
Once you have entered all your expenses in this report, click Submit.

-
Upon submission, your expense report will route for approval based on Trinity University’s policies.
Create an Expense Report (PCard)
-
After logging into Workday, click the Menu in the top navigation bar to access the global navigation.

-
Click on the Expenses menu item.

-
On the Expenses dashboard, you can either complete Actions (edit expense report, create expense report) or you can View (reports, authorizations, transactions, and payment elections). Click on Create Expense Report.
-
Choose Create New Expense Report. The following fields are required.
-
Enter a Memo for the Expense Report indicating the month being reconciled.
-
The Company field will automatically default to Trinity University.
-
The Expense Report Date will default to today’s date. Change this date if needed to reflect the appropriate date of the expense.
-
Enter the following Business Purpose: P-card Reconciliation
-
Select the appropriate Cost Center for the expense. This field will be pre-populated with your default Cost Center.
-
Additional Worktags will automatically populate upon selecting your Cost Center.
-
The fields labeled Grant, Designation, Gift, Project, and Agency are Worktag fields. In Workday, Worktags allow users to “tag” certain transactions for the purposes of financial reporting and routing money to and from the correct ledger accounts. This eliminates the need for entering multiple account numbers, instead using descriptive titles. For your expense report, the Cost Center and some Additional Worktags will default based on your department. The other fields are explained below:
-
Grant: If the expense report is tied to a particular grant, such as an NSF grant, select that specific grant in this field.
-
Designation: If the expense report is tied to designated university funds, select that specific designation in this field.
-
Gift: If the expense report is tied to a gift, select that specific gift in this field. Project: If this expense report is tied to a particular construction project, such as renovations, improvements, or additions, select the specific project in this field.
Note that you will be able to specify different Worktags by expense line to split accounting if needed.

-
Under Credit Card Transactions, check the box next to Select All. Click OK to begin entering your expenses.
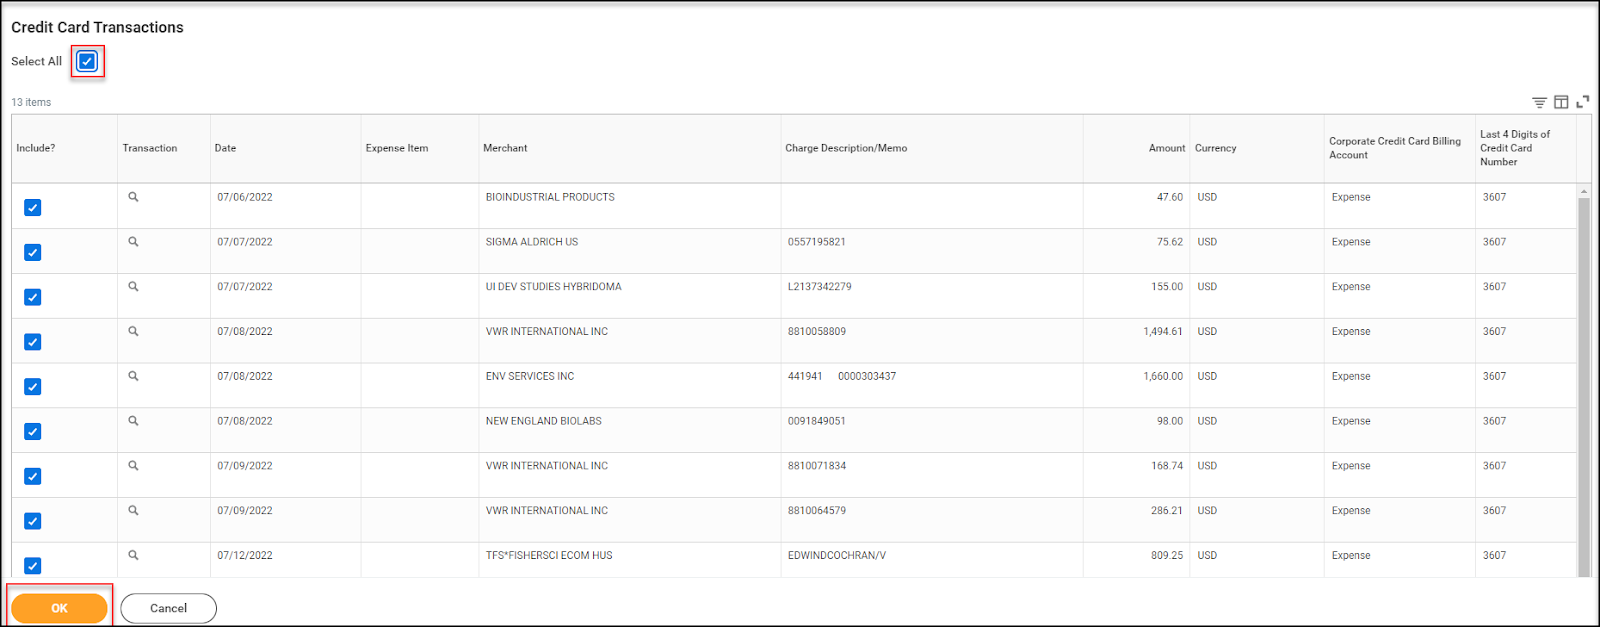
-
All the selected credit card transactions will be prepopulated on the “Create Expense Report” screen.
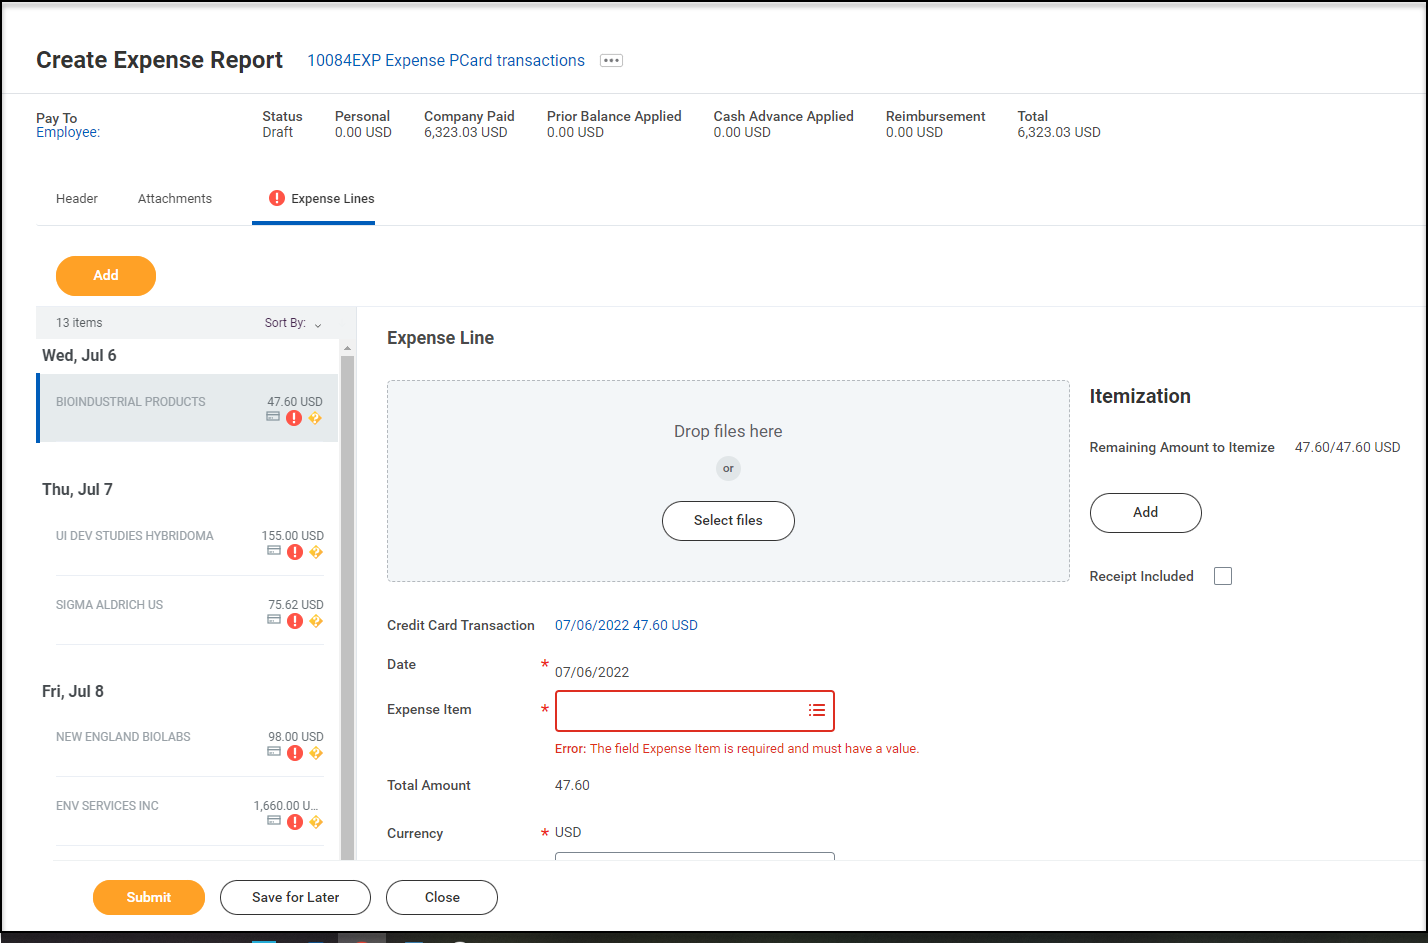
-
The Total Amount will be pre populated.
-
The field Expense Item is required and must have a value for each expense line.
-
A Memo is not required. You may skip this field.
-
The Worktag fields (Cost Center, Additional Worktags) will default. You can change these values if needed to reflect the correct accounting.
-
The Itemize button allows you to split the accounting for this expense. If you need to itemize this expense, you can click the Add button under the Itemization heading and enter the appropriate worktags.
-
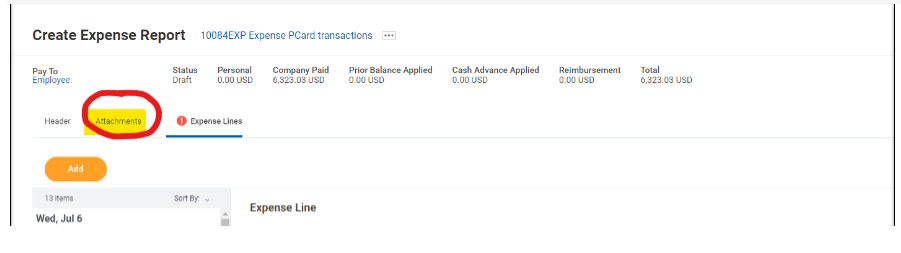
Attach a receipt by selecting the file from the Attachments from File button.

-
Attach the P-card statement from Paymentnet to the P-card reconciliation in the Attachments tab. The amount on the P-card statement from Paymentnet should agree to the "Company Paid" amount on the header of the expense report.
-
Once you have completed entering details for all the expenses in this report, click Submit.

Upon submission, your expense report will route for approval based on Trinity University’s policies.
Note: You cannot change an expense report if it has a payment or pending payment applied to it.
-
On the Expenses dashboard, under View select Expense Reports.

-
On the My Expense Report screen, search for your expense reports by selecting the Expense Report Status, Report Date on or After and Report Date on or Before. Click OK.

-
Your results will display on the My Expense Reports screen.
-
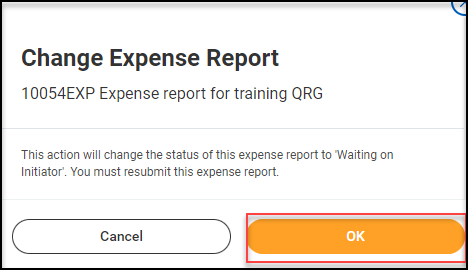
Click the Change Expense Report button in the row of the expense report you wish to modify.

-
A message will display stating “This action will change the status of this expense report to ‘Waiting on Initiator.’ You must resubmit this expense report. “ Click OK if you wish to continue.
-
You may now modify the expense report on the Change Expense Report screen.
-
Once you Submit, the expense report goes through the business process again.
-
On the Expenses dashboard, under View select Expense Reports.
-
On the My Expense Report screen, search for your expense reports by selecting the Expense Report Status, Report Date on or After and Report Date on or Before. Click OK.
-
Your results will display on the My Expense Reports screen.
-
From the Actions  menu for a specific expense report, you may Cancel, Change, Copy or Print. Select Cancel.
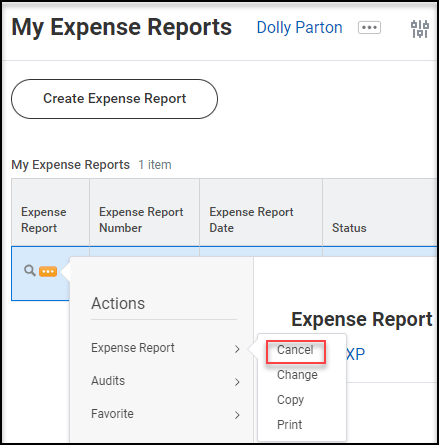
-
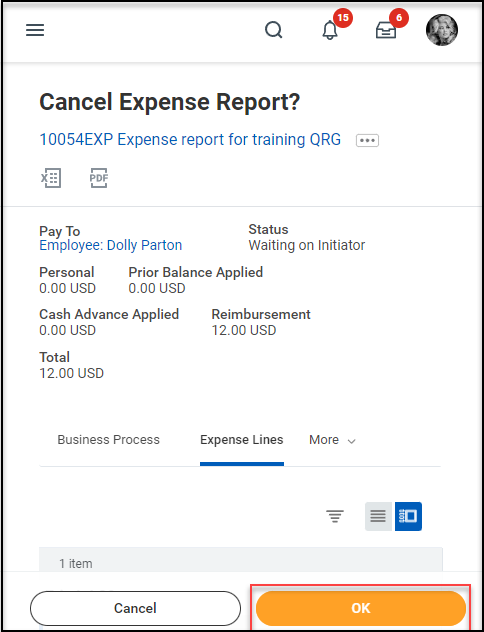
Click OK on the Cancel Expense Report? screen to confirm this action. If you do not wish to proceed, click Cancel.
-
The following screen will confirm that “You have canceled” the expense report.

Approve an Expense Report (for Managers)
-
After logging into Workday, click the Inbox icon at the top right corner, as circled below. The number that appears on the icon represents the number of items currently awaiting your approval or review.

-
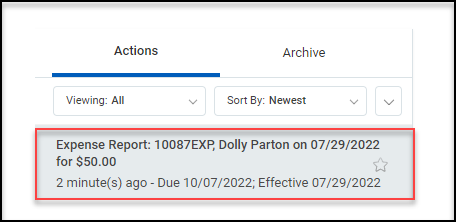
In your Inbox, you can see the items you need to review and approve.
-
On the left column, locate the Expense Report event you wish to approve. Note: If you cannot find the expense report you wish to Approve, check with your team member, and make sure they fully submitted the expense report they created.
-
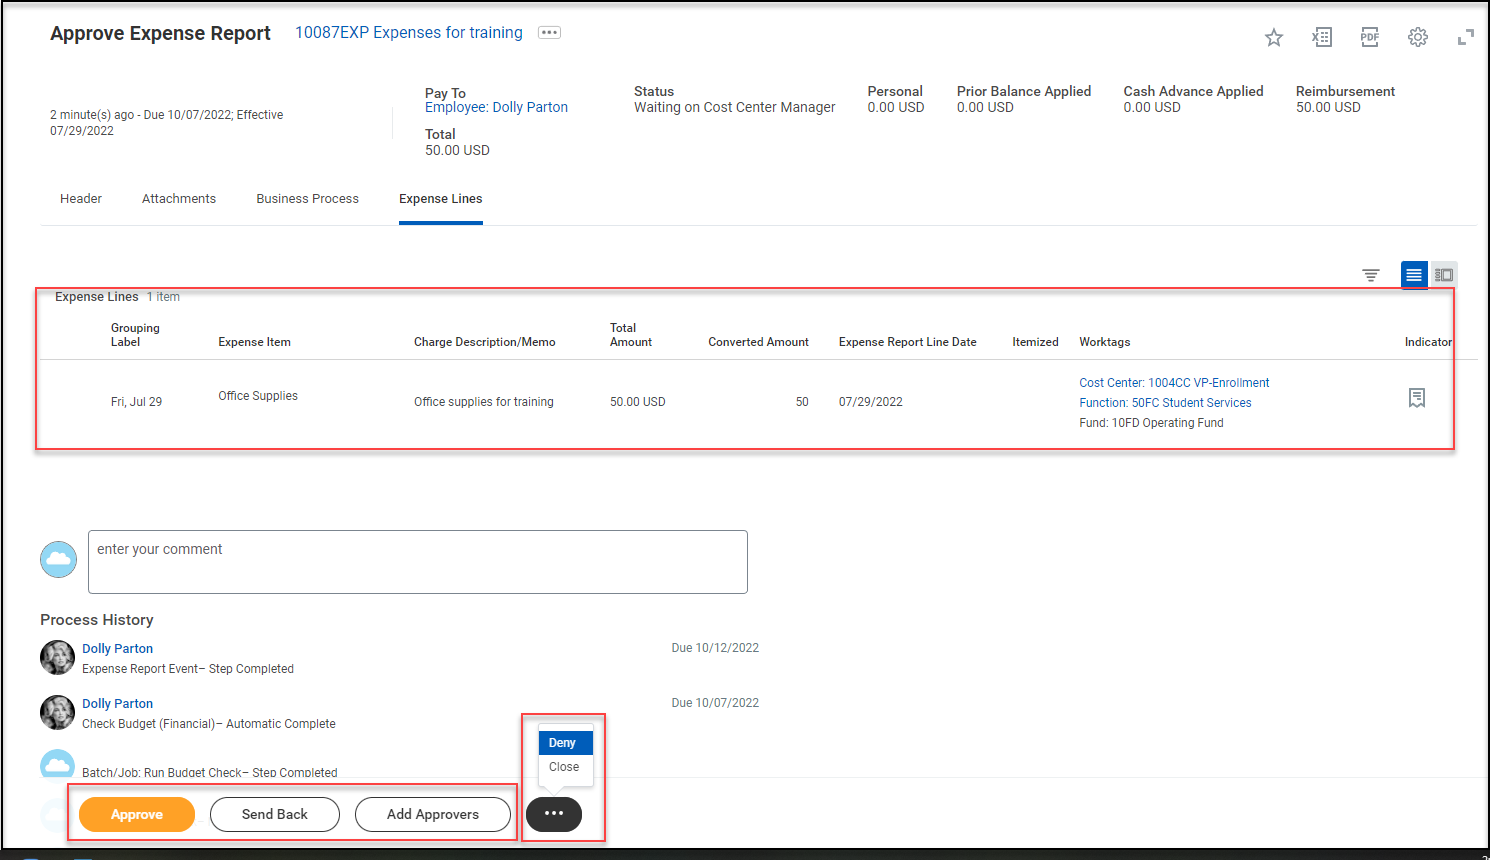
Review the expense lines and when you are ready choose one of the following options:
-
Click Approve to move the expense report through the process.
-
If there is something the employee needs to fix, use the Send Back button, and enter instructions on what must change.
-
If you wish to add additional approvers, you may do using the Add Approvers button. Note: The next step in the process will not happen until the additional approvals complete.
-
Only choose the Deny option if you want the Expense report to terminate. This will not allow any options for clarification, review or editing and the employee will have to recreate the expense report.
-
Choose Close if you are not ready to act currently. The approval will remain in your inbox.
-
If approved, an Event Approved message will appear and the expense report will route through the remaining business process.

TU Cash Transmittal Form - to be used by all TU department deposits when a point of sale device is used. The form is to be printed and attached to all deposits from point of sale devices. Users will attach the form to cash, checks and credit card transaction settlement reports and submit them to the cashiers; Student Financial Services; Northrup Hall 108.
For additional help, please use the Workday Support Request Form or send an email to transform@trinity.edu